Secure File Transfer Protocol (SFTP) is a secure method for transferring files over a network. Unlike traditional FTP, which sends data in plain text, SFTP utilizes the Secure Shell (SSH) protocol to encrypt both the authentication information and the data being transferred. This encryption ensures that sensitive data remains protected during transit, making SFTP a preferred choice for secure file transfers in various environments.
Having an SFTP server is important in a VMware environment for secure and reliable file-based backups. Components like vCenter server, NSX manager, and SDDC manager use SFTP for file-based backups. SFTP also allows for centralized backup management and remote storage, enhancing disaster recovery capabilities by safeguarding data off-site and enabling quick restoration.

In this blog post, I’ll explain step-by-step how to setup SFTP service on an Ubuntu server.
Step 1: Update System Packages
As always, it’s a good practice to update the package list before installing new software to ensure you have the latest versions. To start this process, run the below command to update your Ubuntu server.
sudo apt updateThis command updates the local package index with information about the latest available packages and their dependencies.
Step 2: Install OpenSSH Server
As explained before, SFTP is part of the OpenSSH suite, so you need to install the OpenSSH server package on the Ubuntu server. I usually install OpenSSH on my Ubuntu server while installing the operating system by enabling the below option.
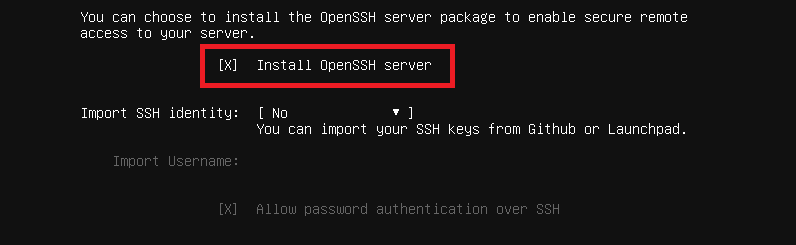
But if you didn’t install OpenSSH on the server during the OS installation process, run the below command to install the OpenSSH server, which provides the SSH protocol, including SFTP.
sudo apt install openssh-serverStep 3: Verify SSH Service
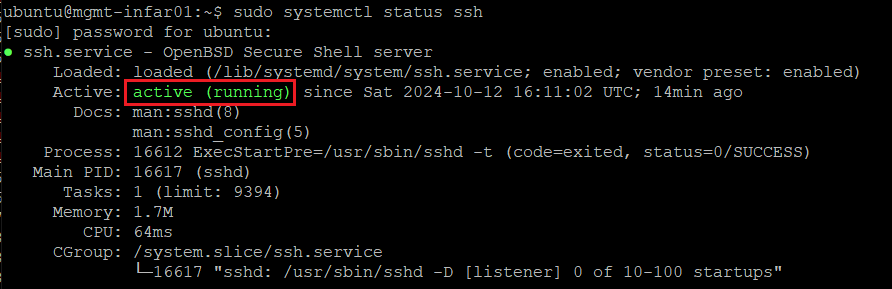
After installing OpenSSH, ensure that the SSH service is running. Running this verification is crucial because the SFTP service is dependent on a running SSH service. This command checks the SSH service’s status to ensure it is active and running.
sudo systemctl status sshAfter running the above command, you’ll see the “active (running)” state if the SSH is running.
Step 4: Modify SSH configuration for SFTP
To configure SFTP, you need to modify the SSH configuration file. This command opens the SSH configuration file in the Nano text editor. But you can use any text editor you prefer.
sudo nano /etc/ssh/sshd_configIn the SSH configuration file, locate the following lines and uncomment and rename it to “Subsystem sftp internal-sftp“
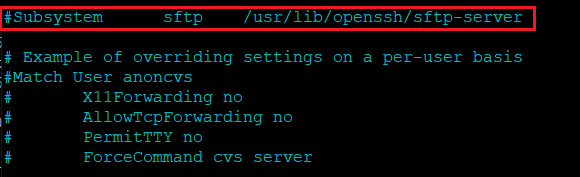
This line specifies the subsystem for SFTP. Changing it to internal-sftp uses the built-in SFTP server from OpenSSH, which is more straightforward and more secure.
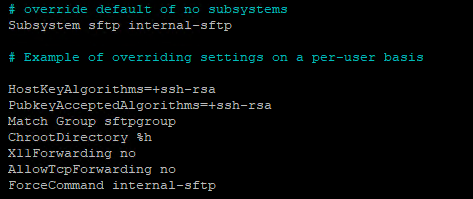
Next, add the following at the end of the file to configure a specific user group for SFTP (optional but recommended for better security):
Match Group sftpgroup
ChrootDirectory %h
X11Forwarding no
AllowTcpForwarding no
ForceCommand internal-sftp
It is super important to configure below two lines above the rest of the configurations if you are planning to use this SFTP server for backing up VMware components;
HostKeyAlgorithms=+ssh-rsa
PubkeyAcceptedAlgorithms=+ssh-rsa
At the end, the config file should look like this;
Save the configuration and exit the Nano editor.
Step 5: Create SFTP User Group and Users
Continue creating a new group for SFTP users and then add users. We will use this group and user to assign permission and authentication purposes. Run the below command to create a new group called sftpusers.
sudo groupadd sftpusersAfter creating the group and add a new user and assign it to the SFTP group. Because I will utilize this SFTP server for backing up servers, then I will create a user called sftp-backup.
sudo useradd -m -G sftpusers -s /sbin/nologin sftp-backup
sudo passwd sftp-backup
The above commands will create a new user sftp-backup, add it to the sftpusers group, create a home directory, and set their shell to nologin to prevent SSH login. And finally, I set the password for the new user.
Step 6: Set Permissions
It’s time to ensure proper permissions for the backup directory. Here, I create a folder called backups under /srv and give the sftp-backup user and root the right permissions to write files in the directories.
mkdir -p /srv/backups
sudo mkdir -p /srv/backups
sudo chown root /srv/backups
sudo chown sftp-backup:sftpusers /srv/backups
With the above commands, we set the ownership of the backup directory to root, which is required for chroot to work and also set the ownership of the backups directory to the sftp-backup user.
Step 7: Restart SSH Service
After making these changes, restart the SSH service to apply the new configuration.
sudo systemctl restart sshThis command restarts the SSH service to apply the new configuration settings.
Step 8: Test SFTP Connection
Now, test the SFTP connection using an SFTP client or the command line.
sftp sftp-backup@sftp_server_ipThis command attempts to establish an SFTP connection to your server using the newly created sftp-backup user.
Following these steps, you should set up a secure SFTP server on your Ubuntu server.
After configuring the SFTP server, now you can configure file-based backups on NSX Manager and vCenter Server.